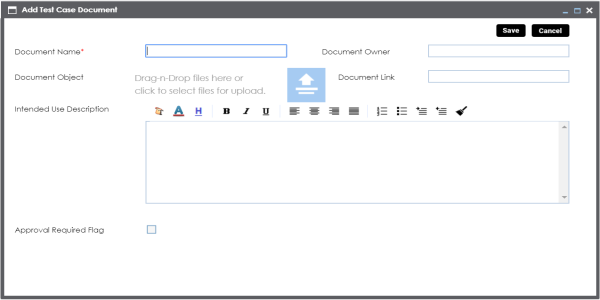
You can upload supporting documents to a map level test case and describe its intended use.
You can also specify:
- Document name
- Document owner
- Document link
- Document status
To add documents to map level test cases, follow these steps:
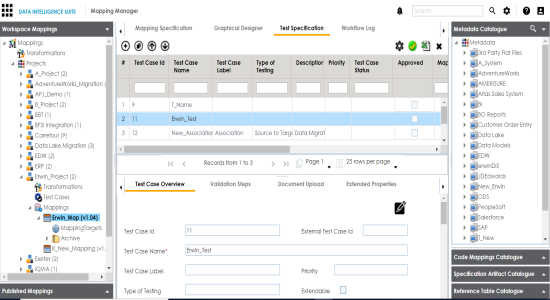
- Under the Workspace Mappings pane, click the required map and click the Test Specification tab.
- Double-click the required map level test case.
- Click the Document Upload tab.
- Click
 .
. - Enter appropriate values in the fields. Fields marked with a red asterisk are mandatory. Refer to the following table for field descriptions.
- Click Save.
The Test Overview page appears.
The following page appears.
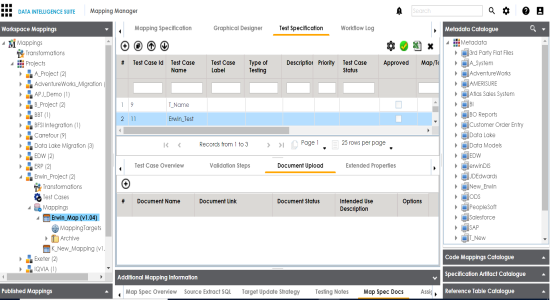
The Add Test Case Document page appears.
|
Field Name |
Description |
|---|---|
|
Document Name |
Specifies the name of the physical document being attached to the test case. For example, Source Metadata Details. |
|
Document Object |
Drag and drop document files or use |
|
Document Owner |
Specifies the document owner's name. For example, John Doe. |
|
Document Link |
Specifies the URL of the document. For example, https://drive.google.com/file/l/2sC2_SZIyeFKI7OOnb5YkMBq4ptA7jhg5/view |
|
Intended Use Description |
Specifies the intended use of the document. For example: The document has information about the source metadata. |
|
Approval Required Flag |
Specifies whether the document requires approval. Select the Approval Required Flag check box to select the document status. |
|
Document Status |
Specifies the status of the document. For example, In Progress. This field is available only when the Approval Required Flag check box is selected. |
The document is added to the test case.
|
Copyright © 2020 erwin, Inc.
All rights reserved.
|
|